
I’ve been hand stitching leather goods for a couple of years now; small accessories made with painstaking attention for friends and family in the comfort of my little basement. It’s so satisfying to see a piece of leather change colour, take on a new form, become something functional and loved. But although I do enjoy the slow, therapeutic movements as I saddle stitch a wallet, I have often also dreamed of finding a sewing machine…
…to allow me to make on a bigger scale and continue making even when I’m short for time. (In actual fact, I don’t think I even knew what ‘being short of time’ meant until I became a mother but that’s a story for another day…) I set about researching to find myself the second hand machine I had always wanted but could never afford.
So where do you begin when you have no idea? My online research threw up so many models and options, different budgets and opinions. Youtube has some useful videos but so many of them are American and the machines, reviews and retailers are just not relevant to my little basement business in Europe. So, 3 main types of machine, several different characteristics and many different end uses:
- FLAT BED – This kind of does what it says on the tin; the material feeds between the needle and a flat ‘arm’ area making it easy to sew quite simple, 2D shapes, for example in dressmaking. Your average domestic sewing machine is probably a flat-bed designed for sewing light to medium weight fabrics. Once you start sewing something substantial like leather however, you’re going to need an industrial flad-bed as a ‘leather needle or ‘denim needle’ on a regular machine will only get you so far.
- POST – Mostly used for shoemaking although I’ve also seen them in the auto interior industry. Here, instead of having a flat workspace, you have a column, or post, and often, rather than a foot helping to keep the leather in place as you sew, there is a wheel. The idea behind the post is to give you maximum manoeuvring space as sewing shoe or boot uppers (the leather ‘body’ of the shoe) can be quite fiddly because they’re not flat.
- CYLINDER ARM – The third type that interested me was this one. Ideal for small leather goods and seemed to me to be something of a good compromise; not having to balance on the head of a narrow post but still having manoeuvre space and a curved form to allow stitching 3D structures.
I won’t even attempt to go into the technical stuff here as I really am not very technically minded and I’d do a terrible job at explaining specifications, comparing motors and discussing needle clearance (er, what?!) but safe to say, I have found my mechanised baby! She’s a Pfaff 335, possibly 1950s-60s and she sews a mean straight stitch!
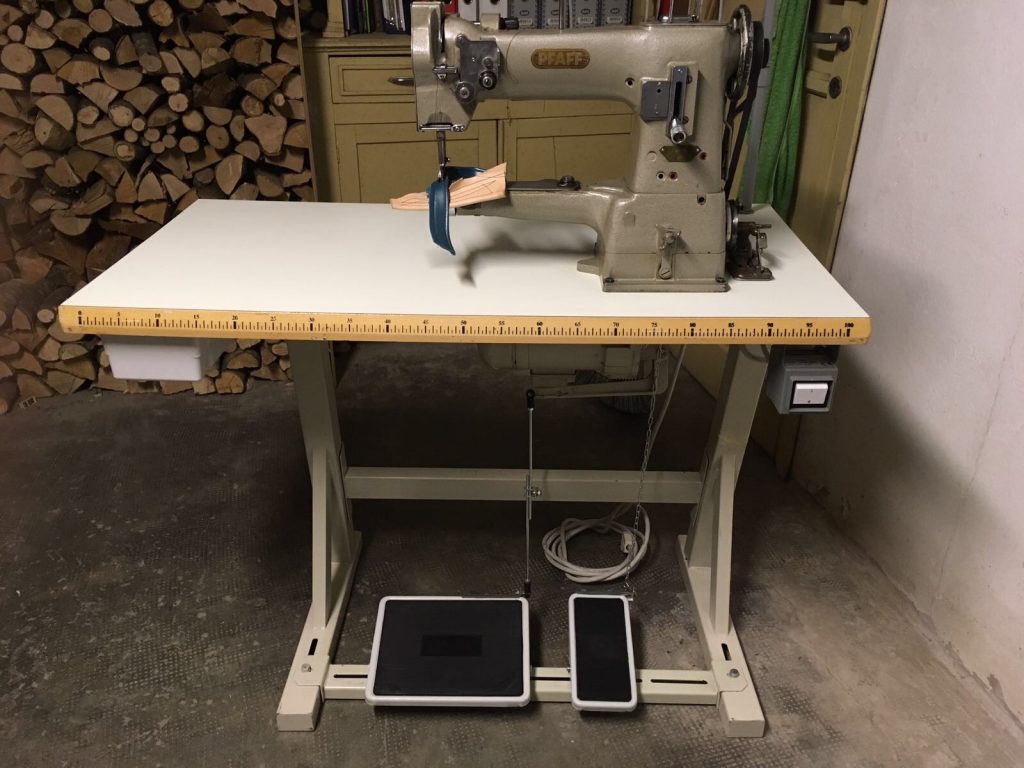 I knew I wanted an Adler, Singer or Pfaff, not only for their reputations but also for the ease of replacement parts (although fingers crossed this one is in good working order). A few times during my research I came across people mentioning a Pfaff 335 and speaking very highly about its capabilities. After much searching, I finally found one in Brescia, Italy.
So far I’ve managed a little experimenting but I must admit it’s not easy to regulate the tension. I expect there’s some magic formula comprising the needle size, weight of leather and thread thickness. I’ve read that nylon thread is more resistant than cotton but my knowledge ends there I’m afraid! I need to research this more and come back to this topic in a future blog post if I find the answer! If anyone out there can offer up some advice here, please feel free to leave a comment below!!
Zoe x